How to use Active@ ISO Burner 2.1
How to burn a CD/DVD/Blue Ray ISO Image:
1. Step:
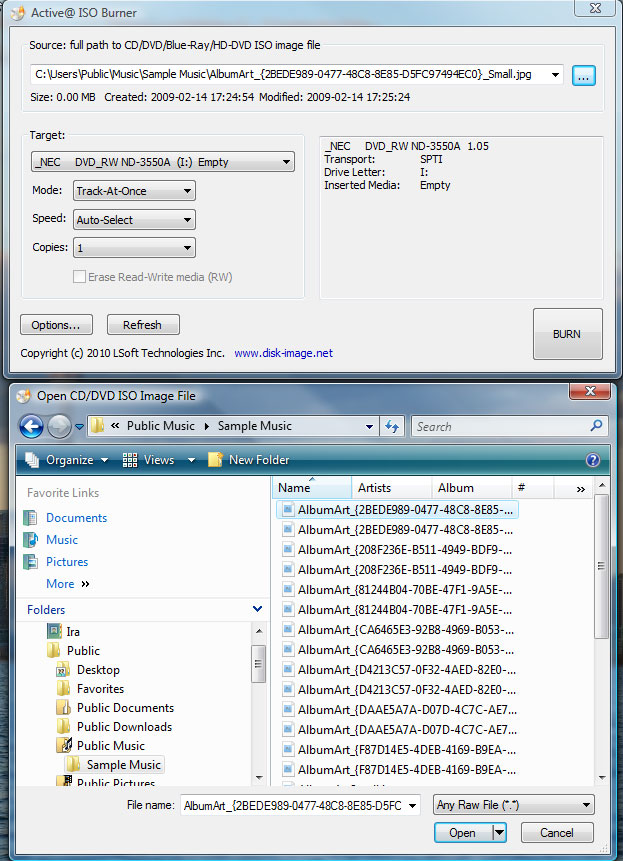
Enter full path to the ISO image file to be created in the Source field.
- Use the Browse button to specify the path and file name via a standard File Save As... dialog.
(You can also Drag & Drop files from Windows Explorer to the Active@ ISO Burner dialog window.) - You can place ISO file to the same directory where Active@ ISO Burner is installed/copied.
- After program is launched, the ISO file will be selected automatically. A drop down list contains all ISO files burned previously, it may also help you re-select the ISO.

2. Step:
Insert a CD/DVD/Blue Ray disc into the burner drive.
- Wait until media is properly detected and media information is displayed on the right.
- In the Target area verify the proper Burner to be chosen (if you have several burners), verify media information on the right, and click the BURN button.
In the most cases, default burning options are acceptable, however you can easily customize the process of burning by specifying:
- Burning Mode: Track-at-Once, Session-at-Once, Disk-at-Once (if supported by inserted media).
- Burning Speed: either Auto-Select, or select from the list of available writing speeds. Optimal burning speed depends on the disc used and burning device capabilities. Poorly chosen burning speed may result in coaster disc. To determine the best burning speed you can make test burns or consult your device and disc manufacturer's recommendations.
- Copies to Burn: if more than one specified - application will just wait until the next media is inserted, when burning is complete. Burning will start automatically.
- Erase Media: for Read-Write (RW) media type you can specify the Erase action explicitly.
Advanced options can be specified in the Options... dialog which is described below.
3. Step:
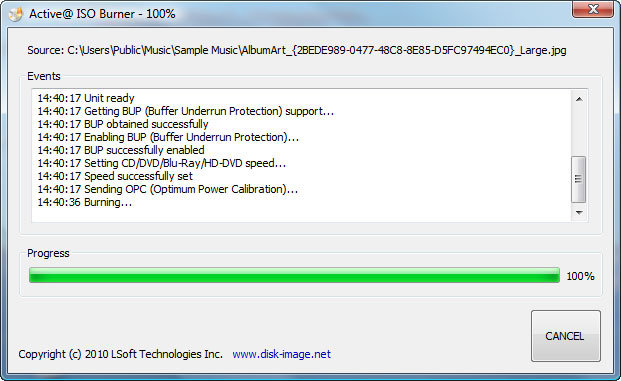
Wait until burning is complete. The log includes the actions performed, errors, and the progress. To cancel ISO image burning click the CANCEL button. After burning is complete, click the GO BACK button to burn another ISO image, or just close the application.

Burning Options :
Click the Options... button to open the burner settings dialog. Default settings are shown below:
Transport - SCSI transport to use for device access:
- SPTI - SCSI Pass Through Interface - this transport is preferable and works only on NT based systems (NT4/2000/XP/2003/Vista/2008). Under Windows Vista it will allow you to burn under User's account (no Admin's privileges). No additional drivers or utilities need to be installed to use SPTI.
- SPTD - SCSI Pass Through Direct - this transport is preferable and works only on NT based systems (NT4/2000/XP/2003/Vista/2008). Additional SPTD drivers need to be installed (included in installation) and machine re-booted. If installed - allows to burn on ALL NT based systems under User's account (no Admin's privileges).
- ASPI - Advanced SCSI Programming Interface - this transport is primarily intended for Windows 9x systems (95/98/ME), but can be used on Windows NT based systems (included WnASPI32.dll must be located at the same directory where Active@ ISO Burner is installed/copied).
- Cache Size - size of the cache buffer in megabytes. Gives a basic level of Buffer Under RuN Error Protection using software buffers. The data, to be burnt, is kept in the system RAM, before it is burnt to the disc.
- Perform Buffer Underrun Protection (BUP) - sets the status of BURN-Proof (Buffer Under RuN error Proof) flag which helps in protection from BURN error.
- Perform Optimal Power Calibration (OPC) - sets the status of flag for performing OPC, before burning. Performing OPC is a special technique used in newer CD-Recorders for monitoring and maintaining the quality of the disc writing and ensuring the accuracy of all the mark and lands lengths across the disc. The term Performing OPC actually describes a general process which is also known by several trade names including "Dynamic Power Control (DPC)" and "Direct Read During Write (DRDW)". There may be differences in execution which gives some of these implementations competitive advantages over others. Sending OPC calibrates the device laser power at the beginning of burning session to adjust the properties of each recordable disc.
- After-burn Verify Data - After burning is complete - reads CD/DVD/BD media content being burned - to be matched with the source ISO file. Reports any errors detected (if any).
- After-burn Eject Media - after burning is complete - media will be ejected automatically.
- After-burn Shut Down PC - after burning is complete - application will try to shut down the local machine.
Automation of CD-ROM ISO files burning process :
Active@ ISO Burner 2.1 software accepts the following command line parameters to automate ISO images burning process:
- "ISO-FILE" - first parameter is the full path to ISO image file to be burned
- /BURN - if the first parameter is valid (ISO image exists) - burn process starts automatically right after program launch
- /EXIT-IF-OK - if the burning process is successfully completed, program auto-exits. If errors are detected - error messages will appear in the dialog screen (no auto-exit).
Note: You cannot use parameters /ADD and /FILE all together.
Example: To burn Data CD/DVD automatically from command line and exit the program after successful burning, run:
C:\> BurnDataCD.exe /ADD="C:\Temp\My Folder" /VERIFY /EJECT /BURN /EXIT-IF-OK
This command adds a content of folder "C:\Temp\My Folder" (with all its content - recursively) to the list of items to be burned, starts burning immediately after loading, verifies data when burning is complete, ejects media, and exists if no errors detected.